The Tarawa Battle Map: A Visual Guide to a Pivotal Pacific Campaign
Related Articles: The Tarawa Battle Map: A Visual Guide to a Pivotal Pacific Campaign
Introduction
With enthusiasm, let’s navigate through the intriguing topic related to The Tarawa Battle Map: A Visual Guide to a Pivotal Pacific Campaign. Let’s weave interesting information and offer fresh perspectives to the readers.
Table of Content
The Tarawa Battle Map: A Visual Guide to a Pivotal Pacific Campaign

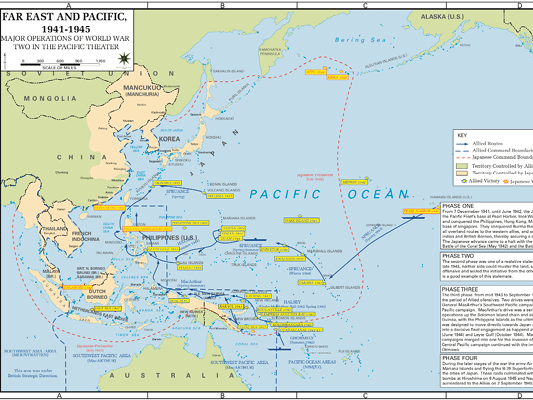
The Battle of Tarawa, fought in November 1943, stands as a pivotal moment in the Pacific Theater of World War II. This brutal, bloody conflict, which saw the United States Marines clash with the Japanese defenders of the island, serves as a stark reminder of the ferocity and complexity of the war in the Pacific. The battle’s importance is further underscored by the fact that it was the first major American amphibious assault against a heavily fortified Japanese island.
To understand the strategic significance of Tarawa, and the challenges faced by the Marines, it is essential to analyze the battle map. This visual representation of the island and its surrounding waters provides a crucial context for understanding the unfolding events.
Understanding the Terrain: A Key to the Battle
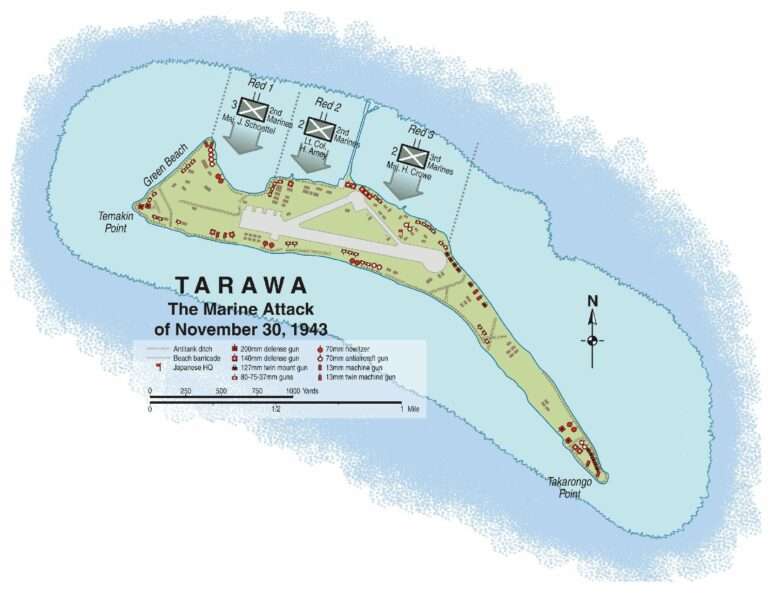
The Tarawa battle map highlights the island’s unique geography, which played a significant role in the unfolding battle. Tarawa, a small atoll in the Gilbert Islands, consisted of two main islands: Betio and South Tarawa. Betio, the main objective of the American invasion, was a mere 1.5 miles long and half a mile wide, but it was heavily fortified by the Japanese.
The map reveals the presence of numerous natural obstacles that hampered the American advance. The island’s perimeter was ringed by a lagoon, creating a natural barrier for landing craft. The terrain itself was a mixture of dense vegetation, coral reefs, and shallow water, making it difficult for tanks and other heavy equipment to maneuver.
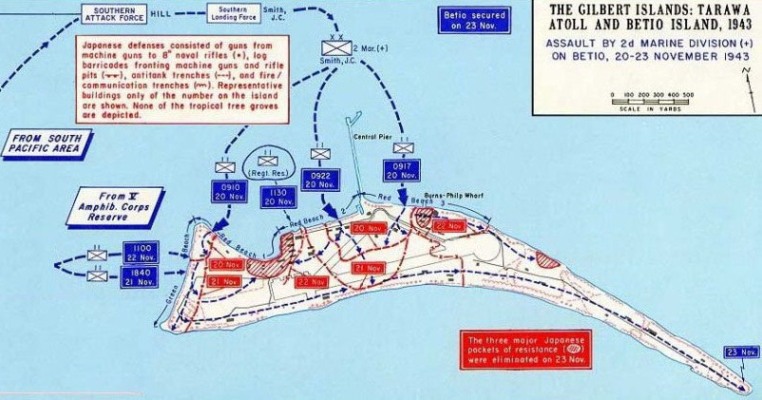
The Japanese Defenses: A Fortified Fortress
The battle map vividly illustrates the intricate network of Japanese defenses that made Tarawa a formidable stronghold. The Japanese had meticulously prepared for the American invasion, transforming the island into a veritable fortress.
- Coastal Defenses: The map depicts the Japanese gun emplacements, machine gun nests, and anti-tank ditches lining the island’s perimeter. These defenses were strategically placed to maximize their effectiveness against an amphibious assault.
- Interior Fortifications: The map reveals a series of pillboxes, bunkers, and trenches located throughout the island. These structures provided the Japanese with a network of defensive positions from which to launch counterattacks.
- Extensive Firepower: The map highlights the presence of numerous artillery pieces, mortars, and machine guns, giving the Japanese a significant firepower advantage.
The American Assault: A Difficult Advance
The battle map provides a visual representation of the American landing zones and the routes of advance. The Marines landed on several beaches along the island’s western shore, facing intense Japanese resistance from the outset.
- Landing Beaches: The map shows the locations of Red Beach, Yellow Beach, and Green Beach, the primary landing zones for the Marines. Each beach presented its own unique challenges, ranging from heavy fire to treacherous terrain.
- Routes of Advance: The map illustrates the routes the Marines took as they pushed inland. The advance was slow and painstaking, with the Marines encountering fierce resistance at every turn.
The Importance of the Battle Map
The Tarawa battle map is not merely a historical artifact. It serves as a valuable tool for understanding the challenges and complexities of amphibious warfare. By studying the map, one can gain insights into:
- Strategic Planning: The map highlights the importance of careful planning and coordination in amphibious assaults. The Americans faced numerous logistical challenges, including the need to transport troops and equipment over long distances.
- Tactical Maneuvers: The map reveals the importance of tactical flexibility and adaptability in combat. The Marines had to adjust their plans on the fly as they encountered unexpected obstacles and fierce resistance.
- Technological Advancements: The map underscores the role of technology in warfare. The American use of amphibious landing craft and naval gunfire support played a crucial role in the battle.
- Human Cost: The map serves as a stark reminder of the human cost of war. The battle for Tarawa was a brutal and bloody affair, with heavy casualties on both sides.
FAQs about the Tarawa Battle Map
Q: What is the significance of the lagoon surrounding Betio Island?
A: The lagoon served as a natural barrier to the American landing craft, forcing them to navigate narrow channels and expose themselves to Japanese fire.
Q: What were the primary defensive positions used by the Japanese on Betio?
A: The Japanese utilized a combination of coastal defenses, pillboxes, bunkers, and trenches, creating a formidable network of fortifications.
Q: What were the key challenges faced by the American Marines during the landing?
A: The Marines faced intense Japanese fire, treacherous terrain, and logistical difficulties in transporting troops and supplies.
Q: What was the role of naval gunfire support in the battle?
A: Naval gunfire support played a crucial role in suppressing Japanese defenses and providing cover for the Marines’ advance.
Q: What were the long-term implications of the Battle of Tarawa?
A: The battle demonstrated the fierce resistance the Americans would encounter in the Pacific theater and highlighted the need for improved amphibious tactics and technology.
Tips for Studying the Tarawa Battle Map
- Focus on Key Features: Pay close attention to the island’s geography, the location of Japanese defenses, and the routes of the American advance.
- Use Color Coding: Utilize color coding to differentiate between American and Japanese forces, landing zones, and key battle locations.
- Connect the Map to Historical Accounts: Compare the map with historical accounts of the battle to gain a deeper understanding of the events.
- Consider the Scale: Understand the scale of the map to accurately assess distances and the relative size of different features.
Conclusion
The Tarawa battle map is an invaluable tool for understanding a pivotal moment in World War II. It reveals the strategic challenges, tactical complexities, and human costs of the Pacific campaign. By studying the map, we can gain a deeper appreciation for the bravery and sacrifice of the soldiers who fought on both sides of this brutal conflict. The battle map serves as a poignant reminder of the importance of careful planning, adaptability, and the human cost of war.


Closure
Thus, we hope this article has provided valuable insights into The Tarawa Battle Map: A Visual Guide to a Pivotal Pacific Campaign. We appreciate your attention to our article. See you in our next article!